Thursday 14 April 2011

Conclusion

Overall I am quiet pleased with the animation that has been created. I think it demonstrates a good number of facial expressions and body language associated with the emotions that were trying to be shown. Emotions such as fear, pain, anger, confusion, shock, and pride were all demonstrated in just a short clip. I think that the research into these expressions has been effectively transferred across to the animation so the audience can understand the characters emotion at every stage.


There are many ways in which the animation in video could be improved. Not enough time was allocated to the creation of the animation and I think the quality really suffered as a result. There are a few points at which the mesh deforms unexpectedly along with the time it was caused by the morpher modifier. I think that more time would have allowed me to pay attention to detail and focus more on transferring the research about facial expression and body language to the animation. I would also have liked to have enough time to be able to render hair and fur and cloud effects. Although these are not worth any marks it would have definitely improved the quality of the finished piece.


I have learnt how to use a few new tools in 3ds max during this module including the physique modifier, which I think makes rigging a biped easier the use of the skin modifier. The second thing I have learned is how to use the morpher modifier. This is probably the modifier I have used that has caused the most problems in all 3d animations I have created prior to this one. With countless conflictions with symmetry, editable polys and footsteps it will not be a modifier I will soon forget. With all the problems it caused, I can see real advantages to its use in future, providing I use compatible modifiers, it will be a real useful tool. The final thing that was new to me in this module was the FFD box controller. Again this was a very useful tool and I can see that it would have many uses in future animations.

Wednesday 13 April 2011

Scene 6 Creation

This final scene in the animation is that where the character emerges victorious from the cave showing off his new tiger skin attire and shades. The material on the cloth object was changed from the standard beige cloth to a tiger fur material. A pair on shades was then created from a box model with symmetry and turbo smooth modifier. These shades were linked to the head of the character using the link constraint tool.

A walk sequence was then set up that would lead the character passed one camera to a shot of him walking off into the distance. At the point in the animation where the character emerges from the cave the morpher modifier was used to show the confident facial expression as the character walked passed the camera. The footsteps at this point were extended in time so the character would pause before walking on. This was done in the dope sheet editor by moving the rest of the footsteps along the timeline before extending the footsteps at which the character pauses.

The footsteps were then bent to form a path along the jungle for the character to follow. Key frames were created for these footsteps and the arm movements were amended to look more natural and also more confident to fit the narrative of the story in the same way as scene 2 by removing the default walk sequence animation and manually creating the arm movements. Finally the cloth object movement was simulated before the scene was rendered.


Scene 4 & 5 Creation

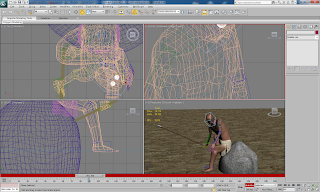
This scene was set inside the cave the character had stumbled into in the previous scene. To create inside of the cave a simple plane was created and textured with the same rock texture in the main jungle scene. A rock object was merged from the scenery which the character would sit on to examine his injured foot. The character was then position on the rock so the scene was ready for animating. Using the auto key tool and moving the biped bones around key frames were created to make the character to appear to be checking out his foot. At this point the morpher modifier was adjusted to set the facial expression of pain whilst the character rubbed his foot better. The animation then pauses as if the character has heard a sound. The character leans back and the morpher modifier is once again used to show fear and shock on the characters face. The character then gets up from his seat and turns to an aggressive pose by puffing out his chest and showing an aggressive facial expression, once again via the use of the morpher modifier. Finally key frames were added to make the character wave his arms and spear in an aggressive manner to show his aggressive emotion.

At this point a target spot light was added to set the lighting in the cave. Only the character and the rock are illuminated to hide the surroundings from the audience and make the cave look more mysterious. The falloff property of the target spot light was adjusted to make the edge of the illuminated area look hazier. Cameras were then added to the scene to pick up the animation from all different angles to show the best view of the facial expressions and body language.

To create the mysterious eyes in the scene a tutorial was followed that explained how to use FFD box controllers. This is something I had never used or looked at before, but was none the less a very useful tool for creating cartoon eyes with the ability to easily apply expressions through deformation to the object the FFD box was controlling. The eyes were created from spheres and then given a material that would make the self illuminate and therefore been seen in the scene without the need for extra lighting objects. The eyes were then positioned and the rest of the tutorial followed to make the eyes focus on a target, in this instance the main character. The eyes were then animated to give the impression they spot the character and then look aggressively at him.

The final part of the animation in this scene was animating the cloth object. This led to yet another problem whereby the simulation kept crashing at certain key frames. As it turned out these key frames were points when the morpher modifier was activated. The only solution that could be found for this problem was to simulate the cloth only when the morpher modifier was not active. This made the cloth look slightly out of place at some places. With use of multiple cameras the points at which the cloth looked odd were mostly able to be left out of shot.


Scene 2 & 3 Creation

This scene was created by using the footstep tool in the biped options attached to the motion panel to create a walk sequence for the character between the jungle and the cave. Footsteps where created using the ‘create multiple footsteps’ tool. These footsteps would be part of the run sequence in the scene, where the character appears to be running from the animal chasing him. Using the bend option, the footsteps were made to lead to the entrance of the cave. In the middle of the scene the character injures his foot by stepping on a rock. At this point in the scene more footsteps were added, this time for a walk sequence. To make the character hop, to avoid using his injured foot, the footsteps for the left leg were deleted. The footsteps were then repositioned to make the hop sequence look more comical and lead the character into the cave. Once in position the automatic key frame creation button was used to apply the animation.

The cloth material modifier applied to the characters cloth was then also animated using the simulate tool in the modifier options. At this point it was clear that the walk sequence did not look natural in regard to the arm movements. Also the arms were catching on the cloth object and distorting it. To fix this the key frames on the arms were deleted and manually redone, so that they looked more natural and did not affect the cloth object. The characters spear was then linked to his hand using the link constraint tool. Finally the cloth object simulation was deleted and re done.

Using the morpher modifier, the expression of pain was assigned to the character models face at the point he steps on the rock using the auto key tool previously used in the created of scene 1. This led to yet another problem with the morpher modifier. Yet again there was a random distortion in the vertices once the morpher effect was applied. I thought this had already been fixed, however this time it was the combination of the footstep tool and morpher modifier. A proper fix could not be found for this as a lot of forum posts led me to believe this was a common problem when using editable polys instead of editable meshes with symmetry. The best solution for this problem was not to turn the percentage of the morpher effect up so high. This gave the character a less than ideal expressive pose, but at least some change in facial expression to let the audience know the characters emotion had changed.


Scene 1 Creation

This scene was created firstly by merging the scenery with the character file. The scenery was then scaled up to match the proportions of the character. The animation in this scene was created by using the auto key tool and manipulating the biped object at different points on the timeline to set key frames. The character was first animated to express the fear emotion on his face using the morpher modifier object and keyframing tools. Next the character was animated to give the impression he was shaking with fear. To do this a couple of rotation key frames were created on the spine links in the biped, and then duplicated many times so the shaking would last the length of the scene. Next the arms were animated to look the character was firstly trying to stop himself shaking, but also to look smaller and inferior by making himself smaller, something my research had identified as a side effect of fear. The final part that was animated was the head. The characters head moves as though he is checking all around him looking for the illusive tiger and then bowing his head in shame about being so scared. To complete the scene a target camera was added to the scene and moved to pick up the best shot of the animation in this scene.

From this point on the idea of using the hair and fur modifier for both the characters hair and the grass in the jungle had to be abandoned as it made rendering time in excess of 24 hours to render a 100 frame scene. Unless a faster way of rendering can be found, the scenes will be without the nice addition the hair and fur modifier adds.


Tuesday 12 April 2011

Using the Morpher Modifier

The morpher modifier is something I have never used before in 3ds Max. I watched a couple of online tutorial videos to learn how to use it. At first I ran into huge problems when trying to apply it to my character model. The first problem was 3ds Max would not let me pick a copied object that had a turbo smooth modifier applied to it. Once removed there was a problem getting the morpher modifier to replicate the morph pose on the main model, as it would pull the vertices into a completely random pose, just like when weighting on a physique modifier was incorrect. I looked at several forum posts on the Internet about this problem and eventually discovered it was a problem caused by the symmetry modifier on the main model and specifically if the vertices on the mirrored edge were moved. The forum suggested using a turn to mesh modifier however this did not work for me. Eventually a solution was discovered, which was to add the morpher modifier just above the editable poly modifier, before the rest of the modifiers on the main model. This meant that the models that were used to create the pose did not have a turbo smooth modifier applied making it slightly harder to get the correct pose, as I had to keep switching back and forward from the main model to the pose model. Using the research information about facial expressions the morphed models were created and then assigned to the main model.


Research - Body Language / Facial Expressions of Pride and Confidence

Facial Expressions:

Direct eye contact is a sure sign of confidence and most commonly is a smile as this show people you have nothing to worry about. Other facial expressions of happiness such as raised cheek muscles are also common.

Body Language:

Raised hands and a puffed out chest are common forms of body language as a result of these emotions. This is common in both apes and humans to show their dominance as a result of the confidence they are feeling. Similarly clenched fists and thrown back heads are also common. This body language is similar to that of the aggression emotion. It is only when combined with facial expressions that the meaning of the body language is truly understood. This means when animating my character I will need to put extra emphasis on the facial expression so the audience is not confused about the characters current state of emotion. Wide footsteps and arms movements are also a sure sign of confidence which make an individual seem purposeful and therefore confident.

Examples: